Goose Barbecue – Crock pot recipe

Goose Barbecue - Crock Pot Recipe

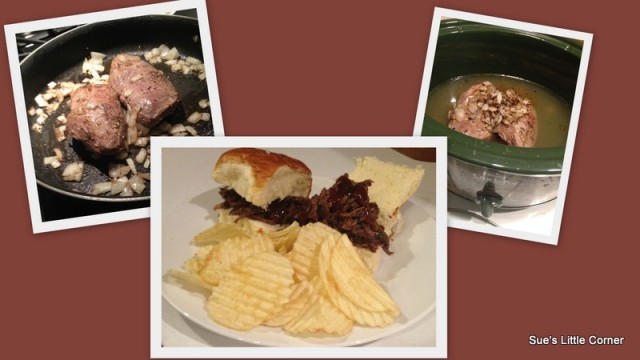
Beginning of Fall, I just love this time of year.  Warm days and cool evenings.  Plus for our family that also means hunting season has started!  Right now Goose season is in.  Which hubby was able to bring a few home.  One of your favorite Sunday dishes is Barbecue while watching Football.   Hope you enjoy…

Here is what you will need:

  • 1 crock pot
  • 1 medium size frying pan
  • Table spoon of Olive Oil
  • Goose meat (I had 2 goose breast – which I leave whole)
  • 1 small to medium onion (I use the sweet onions)
  • 1 table spoon of crushed garlic
  • Salt and Pepper to taste
  • 32 oz (4 cups) of Chicken broth
  • Your favorite Bottle of barbecue sauce (We like Sweet Baby Ray’s Original)

Directions:

  1. Place Olive Oil in pan along with onions, garlic and whole goose breast (s).
  2. Over a medium to high heat brown the goose meat adding salt and pepper to taste
  3. Once meat is browned place meat, onion and garlic into the crock pot with chicken broth.
  4. Cook on low heat over night or during the day for about 8 hours (until meat starts to fall apart).
  5. Once meat has started to fall apart you can drain the liquid.
  6. Add your favorite barbecue sauce stir let sit about 15 minutes on keep warm temperature then everyone can enjoy!

** I do this recipe with 4 goose breast — If you would like to do more you will need to add more chicken broth. The liquid should just cover the meat in the crock pot. You can add about a cup of water to make it cover the meat if needed.

Posted in Recipes | Tagged , , , , , , , , | Leave a comment

How I saved $$ for Christmas!

A couple people ask me to re-post this so here you go! when I get a chance I will update my totals and send some pics of the baskets I have collected for my Inexpensive Christmas Gift Idea!

Sue's Little Corner

pennies1

Okay here is my post I promised you (One of the reasons I started a blog) on how one of my idea has really helped me!  “Saving Money for Christmas” I am so happy when my ideas pay off!!

Yes before you know it “Christmas” will be here!  I really would like to tell you that every year that I am ready for the holidays!  But that would be a really big lie!  Each year as the years before Christmas sneaks up on me and “BAM” “POW” it hits me like a ton of bricks and I am broke and going crazy trying to get it all done!  So I had an idea, that  I wanted to be ready next year for the Holidays in more than just having some shopping done.  I did not want to dread the Holidays rather enjoy them!  I wanted to have the money set aside…

View original post 1,212 more words

Posted in Uncategorized | Leave a comment

Monkey Bread

Monkey Bread

I just love late summer morning that are cool, you know fall will soon be here!  I have to admit that I love the late summer early fall mornings and evenings.  It is cool in the am, warms up during the day (not to hot) and the evening are cool enough for a little fire in backyard pit to enjoy with a cup of coffee or a glass of wine.

Well this was the first morning that when I woke up it was 60 degrees, sunny and beautiful morning.  So I opened up my house, sat on the porch with my coffee and that overwhelming feeling of wanting to bake just had to be met.  So off to the kitchen I went to see what I had on hand!  These type mornings call for cinnamon…. So I had plenty of biscuits so Monkey Bread it was!

Monkey Bread

What you will need to get started.

  • 4 cans of buttermilk biscuits
  • 3/4 cup of brown sugar
  • 1 stick of butter
  • 2/3 cup of white sugar mixed with 2 table spoons of cinnamon
  • Bunt Pan
  • small sauce pan
  • Cooking spray
  • Raisin about 1/2 cup (optional)
  • Pecans about 1/2 cup chopped (optional)
  • Large Zip-lock bag

Directions (I did a few pics as I made this)

  1. Preheat the oven to 350 degrees and spray bunt pan with cooking spray and set aside
  2. Mix white sugar and cinnamon and put in the large zip-lock bag
  3. Open biscuits and cut each biscuit into 4 pieces

Monkey Bread (1)

  1. Place cut biscuits into zip-lock bag with sugar and cinnamon mixture and shake until biscuits and all coated

IMG_3118

  1. Take coated biscuits and place into prepared bunt pan.  At this point you can add in nut and raisins if you would like.

IMG_3123

  1. Take brown sugar and butter and place in sauce pan over a medium to high heat, stirring until melted.

IMG_3120IMG_3121

  1. Remove from heat and pour evenly over biscuits in bunt pan

IMG_3125

  1.  Place in oven and bake for 25 to 35 minutes making sure you check it at about 20 minutes.

  2.  Remove from oven when done and let cool 5 minutes,  Turn upside down on a cake place or plate and let sit for about 10 to 20 minutes.  Carefully lift pan and Enjoy!!!

Posted in Recipes | Tagged , , , , , , , | Leave a comment

Busy Weekend! Helping Make Memories

I love my weekends and love spending time with family and friends making memories.  This weekend I was able to help create a special memory for a friends daughter.  It was a busy weekend but so well worth it. (Over 100 cupcakes, 100 Bride and Groom cake pops and a Wedding Cake)  Here are a few pictures of the cake, cupcakes and cake pops that I did for her wedding.

Country Wedding

Posted in Family Memories | Tagged , , , , , , , , | Leave a comment

Banana Split Ice Cream Sundae Cake

Banana Split Cake

Banana Split Ice Cream Sundae Cake

Okay in our house we love ice cream… So this past weekend we wanted something a little different to take to a friends house for a little cookout!  Most of the time when we all get together we sit an talk about ice cream and banana splits or just ice cream with everything piled high and wish we had some!  So this evening we decided we needed to make sure that we had ice cream.  You can adjust this to fit your taste and don’t hold back the sky is the limit with ice cream!!!!!!

Things we gathered:

  • Large tin tray (Pan)
  • One gallon of ice cream (We just did vanilla but you can use any flavor)
  • 24 pack of ice cream sandwiches
  • Can of crushed pineapple
  • Bananas
  • Assorted Sundae Syrups: Chocolate, Strawberry, and Caramel
  • Cool Whip
  • Cherries
  • Sprinkles, Nuts – You can use any topping you like!!!!!

Now here is how we did it:

Step 1 – We let the One gallon of ice cream get soft – then made a layer of ice cream in the bottom of the pan.

Step 2 – We made a layer of ice cream sandwiches

Step 3 – We did a layer of sliced bananas

Step 4 – We put drizzled all the different syrups on top of the bananas and sandwiches

Step 5 – Another layer of ice cream

Step 6 – Another layer of ice cream sandwiches

Step 7 – Layer of crushed pineapple

Step 8 – Final layer of ice cream

Step 9  – Put back into the freezer for a couple of hours

Step 10 – Take out of the Freezer Cut like a cake (in squares) Serve and top with Cool Whip and toppings!  Don’t forget the cherry on top!

It was a little messy but fun to make!  This topped off a perfect evening with friends and family!!!!

Posted in Recipes | Tagged , , , , , , , , | Leave a comment

Apple Pie Jam

Apple Jelly and Jam

Since I have learned the basics of making jelly and jam.  Yes I have had a few batches that made pretty good syrup! I decided to try something different with my leftover apples.  I had about 8 good size apples leftover, I had enough Freezer Apple Pies put up, loads of Apple Jelly.  I have tried my hand at apple butter but need to revisit this at a later time.  I decided that I wanted Apple Pie Jam.  So this is what I came up with:

Here is what you will need:

  •  Peeled, cored and diced up apples (I use about 8 good size apples)  You will want to get about 4 1/2 cups of cooked apples.
  • 1 cup of water or apple juice (I used a cup of the homemade cider we had made)
  • 5   cups sugar
  • 1/2 tablespoon of butter
  • 1 box dry pectin (I use Sure-Jell)
  • 1 1/2 teaspoon of apple pie spice mix
  •  or you can use the below if you do not have the apple pie spice mix
    • 1-1/2 teaspoons ground cinnamon
    • 1 teaspoon ground nutmeg
  • Jars with 2 piece lids – 8 8oz jelly jars or you can substitute the 4oz jars for some of the larger ones.
  • Jar Lifter
  • Canning Pot
  • 6 to 8 quart sauce pot – I used my dutch oven (it is a much thicker/heavier pot)
  • funnel (this makes it easier to ladle juice into jars)

Directions

  1. Prepare jars and lids per manufactures instructions.
  2. Place the diced up apples in a large heavy pot such as a dutch oven with one cup of (water, apple juice or cider).  Cook over a medium to low heat until apples are tender. Stirring to make sure they do not burn or stick to the pot.
  3. Measure 4 1/2 cups of the cooked apples  (you may have leftovers you can save or discard) My hubby ate mine!
  4. Place the 4/12 cups of cooked apples to pot stir in sugar, spices and butter and bring to a full rolling boil.
  5. Add pectin and continue to boil for 1 minute.
  6. Remove from heat and skim off any foam. Ladle into prepared jars, within 1/8 inch of top. Wipe jar rims and threads with damp cloth. Cover with two piece lids. Screw on tightly.
  7. Place in a hot water bath for 10 minutes, making sure the water is 2 inches above the jars lids.
  8. Take jars out of hot water bath and let cool.  Make sure you recheck the lids after they have cooled and tighten if necessary.

Enjoy!

Posted in Recipes | Tagged , , , , , , , | 3 Comments

Making apple cider and memories over the weekend!

Making Cider

Making apple cider for the first time.

We had the best weekend!  My neighbor that I get my apples from has had a cider press now for about 2  years that we have not been able to use!  When they ordered it, the press  came in a month to late for the apples. The next year the trees were barren due to the crazy weather we had.  Finally this year the apples made and appearance!  So this weekend we did a last minute “Let’s do this”.  So we all picked apples and put them in a large white cooler.  Next the men set everything up while we enjoy a little break.  We did figure this was going to be an all afternoon evening event.  Well to our surprise we were done in less than an hour and cleaned up and that included picking the apples!  Finding containers to hold all the juice is another story!   The cider was sooo good!  Even better cold!

Of course it being our first time doing this we all wanted to know how to make cider since we had the best apple juice ever.  So, what is the difference between apple cider and apple juice we all asked?  “Google IT!!” My husband said with a big grin, because that is his favorite saying here lately!  So we did:    “The Massachusetts Dept of Agriculture tells us that apple cider is raw apple juice that has not undergone filtration to remove coarse particles of pulp or sediment, like apple juice has. In other words, apple cider is simply raw, unfiltered apple juice.”

We were all giggled and continued to enjoying this beautiful weather we had for the evening and our apple cider we had all had a hand in making, and decided to cook on the grill and make a little dessert for later (Ice Cream sandwiches layered with caramel and chocolate syrup more layers and more of the caramel and chocolate….. then frosted with more ice cream like a cake – Yes it was soo yummy).

So as you can guess I will be making more jelly with the apple cider using my Apple Jelly – Done with Apple Peels and Cores recipe but I will make a few changes to it that I will make sure I post and also trying out a new one, Apple Pie Jam.  Yummy Yummy

P.S. The pears in the fruit orchard still have couple of weeks before they are ready, Yep you guessed it we are going to try an make pear (cider/juice) and of course pear jelly, pear jam will follow!

Posted in Family Memories | Tagged , , , , , , , | Leave a comment

Apple Jelly – Done with Apple Peels and Cores

IMG_3079

Don’t waste this apple peels and cores or those little apples you thought had to many spots!  One year after making about 40 freezer pies I could not believe how big the pile was of peels and cores.  So I did a little research and found out you can boil them with just a enough water to cover them and make apple juice. (Well after you strain it.)

I am going to do my best to explain step by step how to make the juice!  I have been doing this for years that I don’t even think to measure!

  • I take a very large tall pot and fill it over half with the peels, cores and pieces of apples that did not get used in the pies. (I think it is about 8 cups of peels, cores and apple pieces.)
  • Fill pot with water even with the peels and cores.
  • ****** If you only want to make enough juice for one batch of jelly then you can measure 5 cups of water into a pot and fill with peels and cores.  (making sure to mash them down). 
  • Bring to a boil then reduce heat to a low simmer and simmer for 30 minutes.
  • Let cool 30 minutes.
  • Strain using either a mesh strainer with cheese cloth or a Jelly bag
  • You should have about 5 cups of juice – You can strain it again if you desire to make sure you will get clear jelly.

Don’t worry if the juice still looks cloudy it will clear up during the jelly cooking process.

Here is what you will need:

  •  4 cups of apple juice – this is the juice that you just make with the apple peels and cores.
  • 5   cups sugar
  • 1 box dry pectin (I use Sure-Jell)
  • 1 1/2 teaspoon of apple pie spice mix (Optional)
  • Jars with 2 piece lids – 8 8oz jelly jars or you can substitute the 4oz jars for some of the larger ones.
  • Jar Lifter
  • Canning Pot
  • 6 to 8 quart sauce pot
  • funnel (this makes it easier to ladle juice into jars)

Prepare jars and lids per manufactures instructions.

  1. Measure sugar exactly and set aside.
  2. Place 4 cups of juice and 1 box of pectin in a 6 to 8 quart sauce pot.
  3. If you decide you want to add cinnamon or apple pie spice mix add it now wit the pectin.
  4. Bring mixture to a full boil (a boil that does not stop bubbling when stirred) on high heat, making sure you stir constantly.
  5. Stir in sugar slowly. Return to rolling boil, when it gets to that rolling boil time exactly one minute, Stirring constantly. (Do not over cook).
  6. Remove from heat and skim off any foam with a metal spoon.
  7. Quickly ladle into prepared jars, within 1/8 inch of top. Wipe jar rims and threads with damp cloth. Cover with two piece lids. Screw on tightly.
  8. Process in a hot water bath for 10 mins making sure the water is 2 inches above jars.  If not you will need to add more boiling water to the pot.

I have also added food color to the regular jelly without the cinnamon to make it look more holiday festive looking – like red and green food coloring.

Posted in Recipes | Tagged , , , , , , , | 2 Comments

Homemade Apple Pie – Freeze and Bake Later!

Homemade Apple Pies - Freeze and Bake Later

I just love this time a year when the apples are ready!  So many of them and so many things you can do with them.  One of our favorite things is homemade apple pies!!! But you can only eat so many apple pies at one time!  So here is what we do!

Basic Apple Pie Recipe

  • 6 cups of peeled, cored and sliced apples (Save the peels and cores and apples pieces you don’t use  – I have an “Apple Jelly Recipe using the peels and cores”.
  • 1 cup of sugar
  • 1/3 cup of all purpose flour
  • 1/4 teaspoon of butter
  • 3 table spoons of butter
  1. Combine the above ingredients and put in prepared pie shell (uncooked)
  2. Take the three tables spoons of butter and cut into 4 pieces and place in different areas around the top of the apple filling.
  3. Place crust over top of pie filling and seal the edges with your finger or a fork.

Now at this point you can either cook the pie or freeze it:

For cooking the pie:

  1. preheat oven to 375 degrees
  2. over the edge of the pie crust with foil or a pie guard.
  3. Brush top with milk and sprinkle with sugar (you can add cinnamon to the sugar if you like – Just a sprinkle).
  4. cut out a small hole in the center of crust to vent and make 4 small slices in top of crust with a knife about 1/2 inch long.
  5. Bake for 25 minutes with foil on edges of crust, Remove foil and bake for 20 to 25 minutes more.
  6. Remove from oven and let rest for 20 minutes – slice and server!

For Freezing pies then baking later:

Each year I try and put up about 20 pies to eat later in the year, over the holidays and so on!  Even those cold winter nights.  So I buy frozen deep dish pie shells (they come two to a pack) and Pillsbury Pie crust (or store brand).  These are the ones you put in your own pie dish – I use them to cover the top.(These also come two to a pack).  We make this a family event, one is using the apple corer peeler slicer, the other is mixing the measuring the basic pie recipe.  We put up an additional long table or use the dinning room table and line up the pie shells and fill them all.  Then someone will place the butter and top shell on the pie and seal the edges of the pies.  Then out comes the Food Saver vacuum sealer.

I use my Food Saver vacuum sealer. But you can use Plastic wrap with Tin foil or Large freezer bags.

pies

We place the pies in the freezer to be eaten at a later date!

Cooking a Frozen Apple Pie

  1. Preheat the oven to 375%
  2. Remove the pie from the freezer
  3. Unwrap the pie and place on a baking sheet that has been lined with parchment paper
  4. Cover edges with foil or pie crust saver
  5. Vent middle with small hole and then cut 4 slits about 1/2 long in crust
  6. Brush with Milk and sprinkle with sugar or cinnamon sugar mix.
  7. Bake frozen for 90 minutes check after the first hour.

I have tried to let them thaw out but the crust becomes soggy.

Posted in Recipes | Tagged , , , , , , , , , | 2 Comments

One Liner Wednesday – I’m Something All Right

2889139947_72a0e41dea_o

My body is 70% coffee, 10% wine  and the other 20% is torn on which to choose.

One-Liner Wednesday  Thanks Linda

If you would like to join the fun click the link above.

Posted in Random Thoughts | Tagged , , , , , , , | 2 Comments