
Enjoying a cup of coffee this morning with my favorite mug! My middle daughter gave me this mug! The other two girls and hubby agree with the choice! Good Morning All!
Enjoying a cup of coffee this morning with my favorite mug! My middle daughter gave me this mug! The other two girls and hubby agree with the choice! Good Morning All!


Okay so I love caramel! But measuring sugar and all that stuff and then cooking it to a certain temp I never seem to have any luck and it was always different every time I tried it. So when I ran across this one method several years ago in a candy making class, I fell in love with how easy it was and it turned out perfect every time! You can do so many things with it! Eat it on apples, use in in brownie mix, on ice cream, as a dip for so many things. I tend to eat it straight from the can! I also will put this in a small mason jar or small air tight container with a couple of apples to give as just because gifts. Plus I can make it in advance and have it on hand when I need it!
Stove Top Caramel (3 hours)
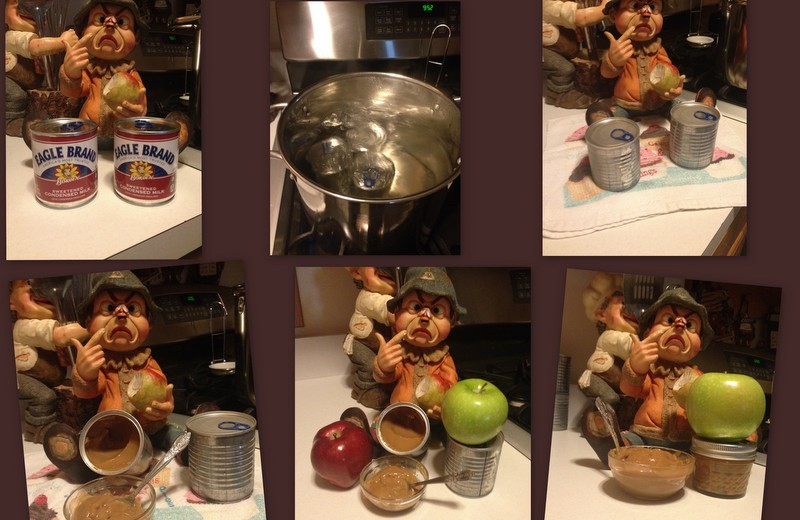
DO NOT open the can of sweetened condensed milk. Place it in the large pot and over it with enough water so the water is about 2 inches above the can. (You will need more hot water to add to this as the cooking time goes on) Place it on the stove on high heat.
When the water starts boiling, set your timer for 1 hour – when it goes off flip the can over
Repeat the above step for the 2nd hour. reset your timer for one more hour.
*** Make sure during the above steps you do not let the water go below the top of the can – You will need to add more hot water to this during the three hours of cooking time. ****
When the third hour is finished take the can from the boiling water and put it on a pot holder or dish towel (something that will not be effected by the heat) and let cool. (till the can is cool to the touch) Then open scoop out into a dish and enjoy.
Store left over caramel in an air tight container. You can store the unopened cans of caramel at room temperature indefinitely.


Sometimes you hear something, could be a quote, a sentence or even a simple word and a light bulb goes off in your mind. It can be amazing how some of the simplest things can turn on that light bulb and bring about so many ideas that turn into great things
So listen to the radio, take a walk in the park, window shop down Main Street or maybe even take a bike ride. You never know when that light bulb will turn on!


Yes you guessed it one of my many ideas! I have been thinking of how to save money for Christmas and also be ready for Christmas. Yes I know it is only July! I really wish I was one of them that had all my shopping done before July, but that is not me! Most years I am shopping right up until a day or two before Christmas. But I am loving these summer months and all the goodies I am canning.
I decided that since I was canning so much (it started out just canning Mulberry jelly) and I figured out it did not cost me much to make per jar, I have my own mulberry tree, and I have been lucky enough to either find the fruits for a really good price or fruit that local markets and local farms that were going to give it to the animals or put on compost piles because they were to ripe to sell. (It never hurts to ask!) That I would do homemade gift basket with an assortment of my canned goods and a few other goodies!
First I made a trip to the Dollar Store to see what I could find.
I also plan on looking at other stores for baskets on sale so I have an assortment of containers! A friend of mine told me to even check the local Goodwill stores. Heck worth a try!
** you can even use Christmas or other occasion wrapping paper and ribbon instead of the bags. I have even saved boxes to wrap once I get my wrapping paper out of the attic.
So each gift is starting out to be about $2.25 each
I have the following goodies that I am going to mix and match that I have made myself.
This list can go on and on. There are so many things you can put in the tub/basket. Depending on who it is for, Coffee mugs (the Dollar Store sometimes has some really cute ones), pencils, note pads dish cloths, even a bottle of wine! Be creative and enjoy!


I saw the other day that the blackberry bush outside my mother-in law’s yard was full of blackberries. So this evening I started picking and before I knew it I had a tub full of big gorgeous berries. I measured enough for me to make some jelly about 4 heaping cups. Needless to say the rest did not go to waste! So one more jelly to add to my canning collections. And again the price of the fruit was perfect (free) well almost, I did pay the price with the thorns mosquitos about 1/2 a pint of blood it seemed. 🙂 I looked around an found my mother- in law’s recipes for her Blackberry jelly. She said it came from an old box of Sure Jell that she adjusted a little and had been using the recipe for years! So I figured I would try it and share it with everyone! This time I have also included some pictures! (Hopefully I will get better at the pictures)
I started with 4 heaping cups of blackberries.


What you will need
Prepare jars and lids per manufactures instructions.
** Only if necessary you can add up to 1/2 cup of water to juice if needed to make exact measurement.

Well I had a list in my head of what I wanted to get done this weekend after a long week of work. So Saturday morning came and I started my list, laundry, bathrooms and so on. During part of this list I decided that I needed to pay a visit to my friends local farm to get my weekly produce. Yes I know you can get a lot of things cheaper at the grocery store but I do believe in supporting local merchants!! I am so glad i made this trip because I was able to scored a nice size bag of very ripe peaches she was getting rid of. So the price was right “free”. I Did a little shopping and went home to finished my list and then decided I needed to dive into the bag of peaches. I had two things in mind more peach jam and peach turnovers (Remember I am canning to save time and money at Christmas). So I started by peeling and slicing up 5 1/2 cups of peaches. I then sprinkled them with some fruit fresh and placed them in the fridge. I gathered my materials I needed and started my canning.The recipe that follows below yielded me 8 – 4oz jars and 3 – 8oz jars. (it is up to you on what size jar you would like to use I mix and match so I have some of both sizes)
Here is what you will need:
In a large canner pot prepare jars and lids (You can find directions on this on the ball website)
Peel and pit peaches. Chop peaches to desired size (I like mine kind of small). Measure 4 cups of peaches into a 6- or 8-quart saucepot. Add lemon juice and stir. Stir in pectin. Add butter to reduce foaming, Bring to full rolling boil (a boil that doesn’t stop bubbling when stirred) on high heat, stirring constantly. Stir in sugar. Return to full rolling boil and boil exactly 1 minute, stirring constantly. Remove from heat. Skim off any foam with metal spoon.
Take jars from water and place on a towel. (I have an old one that I use just for canning).
Ladle immediately into prepared jars, filling to within 1/4 inch of tops. Wipe jar rims and threads. Cover with 2-piece lids. Screw bands tightly. Place jars in canner pot of water. (Water must cover jars by 1 to 2 inches. Add boiling water, if necessary.) Bring water to gentle boil. Process 10 minutes. Remove jars and place upright on towel to cool completely. (about 5 to 6 hours)
After jars cool, check seals by pressing middle of lid with finger. (If lid springs back, lid is not sealed and refrigeration is necessary.)

Yes this is always my problem “Where to start?”. I have so many ideas and things that I want to do! Yes I get these ideas and they sound so good at the time but then – I never write them down or say I will do them later! Have you ever heard the saying “ I can sing all the lyrics to any 80’s songs but when I walk in a room a forget why I did”. Okay so you get the picture.
Today I am going to start with what I wanted to do and partly did in January! Start a blog. My first Idea that got me starting this was wanting to “Save and earn money for Christmas”.
So this is what I started off doing in January!
“Saving and earn money for Christmas”
I know a lot of you would love to smack me, I know it is only July. But I have found that I have saved quite a bit so far! I wish I had posted this sooner for everyone to join in with me to see how much we could all save and compare.
Here is just a little of what I have been able to do with one of my ideas: “Save and earn money for Christmas” I start this the week after Christmas when I was broke, feeling the humbug of the holidays and bills from Christmas were coming in the mail! I started surfing the net looking for ways to make extra money but mostly what I found were scams or just did not work for me. So I started a list of things I decided to sign up for on the web, tracking them weekly and other ways I could save. Here is my brief list of what I have been able to do and really not a lot of extra time involved. (But don’t get me wrong you do have to spend a little time to make it happen).
The below is as of July 1.
$700 in a Christmas Club savings account. (This will grow until November).
I have $100 in survey money.
I have enough points from a site I log on to daily to get 4 – $25 gift cards to places like Target, Walmart, BestBuy, Amazon and so on. (This one will also still grow).
I have also earned a total of $211.64 in Ebates that is in my paypal account!
From Emails that I click on I have enough points to get 2 – $25 gift card to either a store or a restaurant.
And last but not least I have $125 on my Walmart Saving Catcher Account.
So my idea to “Save and Earn Money for Christmas” so far has me $1286.64 ahead of the game plan.
In my next few post I plan on telling you how “Saving and Earning Money for Christmas”. These are things that worked for me. Another Idea for saving and doing ahead gifts “Hint” Canning. I am also sure I will throw in a recipe or two and more of my ideas as they pop in my head!
Wish me luck!
